
No longer must solutions to mathematical problems be written in 'X' (insert Python/C++/R here). With the increasing uptake of integrating AI and optimisation tools in software, it has never been easier for developers to learn more about these topics without having to completely abandon their tech stack.
Using ML.NET, developers can upskill on a technology that's becoming more and more commonplace in development. What's more is that this upskilling can be done from the comfort of a .NET application.
An introduction to ML.NET in delivering machine learning services
ML.NET was first released in 2018. It does exactly what the name implies: Machine Learning in .NET. It's cross-platform and open source, all the usual characteristics we've come to expect with Microsoft in recent years.
First and foremost, ML.NET is a framework for building machine learning models. It provides an API to define, build and train your Machine Learning pipeline. It abstracts out the parts that would otherwise alienate someone without a degree in data science.
If you have a good understanding of what makes a Machine Learning model good, rather than how to get there, you can absolutely use ML.NET.
Microsoft's website outlines the usual workflow of creating a model in ML.NET:
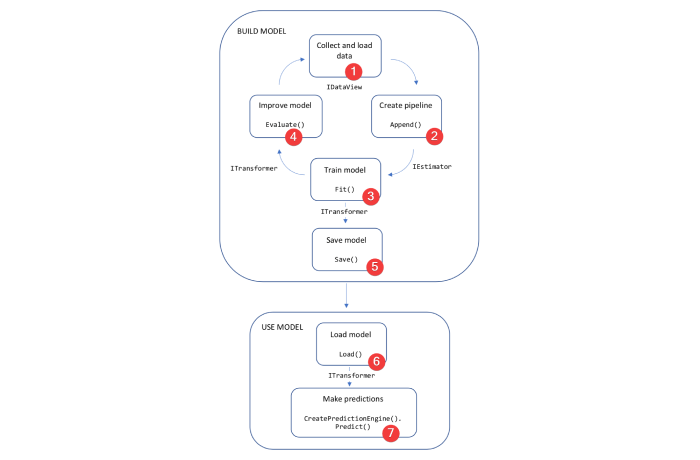
1. Load data: The API provides a number of ways to do this to suit your needs, including (but not limited to):
- CSV
- In-memory
- SQL
The full list of ways to load data into an IDataView can be found here.
Assume we were loading from an enumerable (i.e In-memory):
IEnumerable<ModelInput> trainingData = await _dataRepository.GetTrainingDataAsync();
IDataView dataView = MlContext.Data.LoadFromEnumerable(trainingData);
2. Create pipeline: This step involves defining how we get from an IDataView to something that can predict an output. In this step you can concatenate and normalise your features to match the data and algorithm you're using, but most importantly you need to label which properties of your data are 'features', and which property is the 'label'.
The API defines a builder pattern for appending to your pipeline which makes it easy for developers to customise how the pipeline is created:
IEstimator<ITransformer> pipeline = MlContext.Transforms
    // Combine the features into a single features vector
    .Concatenate("Features", new[] { "Feature0", "Feature1", "Feature2" })
    // Normalize the features
    .Append(MlContext.Transforms.NormalizeMinMax("Features"))
    // ...
    // Other 'Append's as necessary
    // ...
    // Append the training algorithm (in this case using a regression algorithm).
    .Append(MlContext.Regression.Trainers.LightGbm(
        labelColumnName: "Label",
        featureColumnName: "Features"));
You can consider this step as a declaring a 'pointer' from your test data to the trained model. It's data-agnostic, meaning the only time you need to consider the actual data you're training with is when you call Fit() (below).
**NB:** If you're wondering why the `LightGbm` trainer was used, as oppposed to the many other options for regression, this is because when the Model Builder tool creates your model, it attempts all algorithms appropriate to the model you're trying to build, and uses the trainer with the best score. When using the Model Builder yourself, you may find it lands on a different trainer for your example - which would be completely fine.
3. Train model: Now we have both our IEstimator and IDataView we can combine them to output a trained Machine Learning model:
ITransformer model = pipeline.Fit(dataView);
As you might have guessed, this step is the most time and resource intensive. You'll definitely want to capture the usage metrics of this steps before deploying it to any production environments.
4. Improve model: The Fit method doesn't give any information as to how well the model performs. In order to get an idea of this, you can evaluate your model as below:
    // Optional: evaluate the model based on a different set of data than the one trained with.
    // See also: Cross-Validating your model.
    IEnumerable<ModelInput> testData = await _dataRepository.GetTestDataAsync();
    IDataView dataView = MlContext.Data.LoadFromEnumerable(testData);

    // Reminder: `model` is our trained ML model (`ITransformer`)
    var testDataPredictions = model.Transform(dataView);

    RegressionMetrics metrics = MlContext.Regression.Evaluate(testDataPredictions);
Obviously, this example is for a regression model and the RegressionMetrics model outputs information useful for evaluating a regression algorithm (for example, the R-squared value), but the same method is exposed for other algorithms like Classification and Forecasting.
At this point, you decide whether your model is good enough.
5. Save model: Once we're happy with how the model is performing, we can save this version of the model. Keep in mind, it's the ITransformer object (the trained) that we're persisting, so that's the object we'll be passing through to the Save method:
    const string directory = "NAME_OF_LOCAL_DIRECTORY_HERE";
    var modelFilePath = $"{directory}/model.zip";
    context.Model.Save(model, testData.Schema, modelFilePath);
As you can see, the name of the model and location you'll be able to find it is entirely up to you. You can utilize this flexibility should you want to date-stamp or version-label your models, and persist older versions of the trained model. The ability to rollback to previous versions of the model would be very useful in a production environment.
Similarly, being able to source-control your models, and deploying them as an embedded resource in a .csproj is another, perhaps cleaner way in ensuring this behaviour.
This brings an end to the training lifecycle of an ML.NET model. In the next steps we'll go into how you can use this model to make real-time predictions.
6. Load model: In a very similar vein, we can reload our model later using the same file path.
const string directory = "NAME_OF_LOCAL_DIRECTORY_HERE";
var modelFilePath = $"{directory}/model.zip";
var model = context.Model.Load(modelPath, out var dataViewSchema);
This model can then be used to create a prediction engine; something that can convert a input into a predicted output.
services.AddPredictionEnginePool<ModelOutput, ModelOutput>()
    .FromFile(modelFilePath));
It's also important to note that if the model was stored elsewhere, the prediction engine can be loaded from a provided URI.
services.AddPredictionEnginePool<ModelOutput, ModelOutput>()
    .FromUri("URL_TO_YOUR_MODEL");
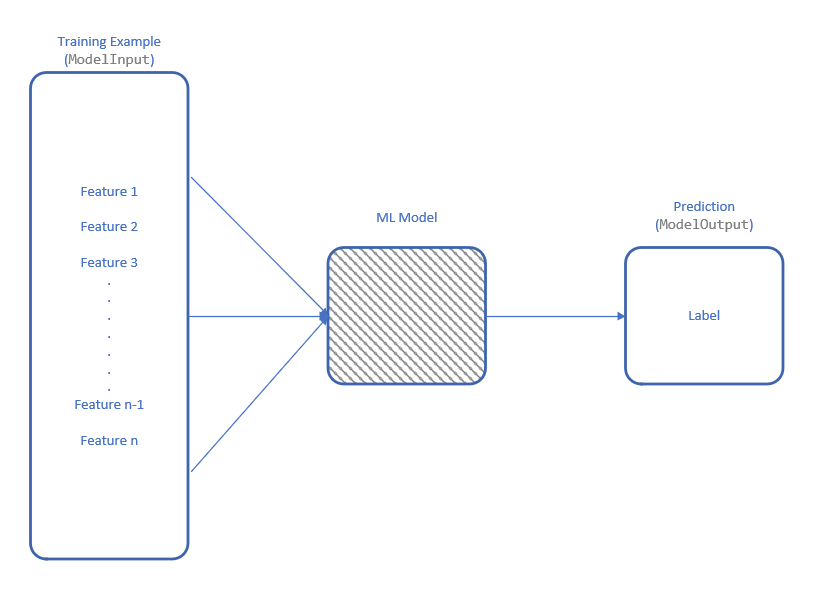
7. Make predictions: In order to make a prediction for a single example, you need to use your loaded model to create a prediction engine. A PredictionEngine has a single public method called Predict, which takes your ModelInput and generates a ModelOutput containing the predicted output.
var modelInput = new ModelInput();//Get/create your input object here.

var predictionEngine = context.Model.CreatePredictionEngine<ModelInput, ModelOutput>(model, true, schema);
var output = predictionEngine.Predict(modelInput);
This quite simple process shows you how to predict a single value from your trained model. As discussed above, this doesn't necessary need to be a local model, and the AddPredictionEnginePool allows you to inject your PredictionEngine to allow you to utilise this behaviour in a separate application layer, if necessary.
Future-proofing your machine learning models
The above walkthrough has shown a very happy-path way of creating a model in ML.NET, but how can you be sure to give your model the best chance of retaining its benefit in future? How will this model react to new, perhaps unexpected data? The below tips are the best practice we've found in implementing ML.NET in enterprise applications:
Re-train periodically
Say the 'type' of data the model constantly predicts changes slightly. In order for your model to adapt and be able to accurately predict this new information, it's vital that the model is re-trained on this new data set.
We saw in the above steps how to train (.Fit()) and persist (.Save()) your model - perhaps you can implement some sort of versioning mechanism to replace the old worse-performing model should you re-train the model and fit it performs better on the most up-to-date dataset.
Investigate prediction errors to make your model more robust
Each time your model predicts something wrong, that is to say the predicted value was very different to the actual value, ask yourself why. With the information the model has, what extra information could it have had to make this prediction more accurate?
This is a great example of the symbiotic relationship that AI and human experts can have; it's not just the model learning from the human, it also can very much work in the other way!
Permutation Feature Importance
Permutation Feature Importance explains the 'weight' of each feature in terms of how much say it has in predicting a final value.
This allows you to order your features (or 'inputs') by the most important to the least - it could be that you're spending a lot of time and resources collecting data that the model deems fairly low on the priority list, or even ignoring completely. This information can be vital in increaasing the efficiency of the training and usage of your model.
Establish a learning curve
A Learning Curve measures how much your model learns as a factor of how many training examples are used.
Crucially, this information helps you determine the number at which your model stops learning. Why spend hours collecting data for millions of examples, when a smaller amount outputs a model that performs identically that is trained in a fraction of the time?
BETA users
Using something like Feature Flags can be a great way to turn on the machine learning model for a fraction of your user base.
Trust is vitally important for consumer buy-in, especially with something like AI. With a targeted amount of BETA users using the model in the software, you can help build confidence in your user base, and perhaps spot any teething issues with using the model in a production environment.
This risk-minimizing approach will undoubtedly help you get your ML.NET model off the ground.
Conclusion
In this post we've introduced ML.NET and the functions it performs, and shown a simple example of how to use this to build a Linear Regression model.
With the increasing implementation of AI-based solutions in software projects, we're excited to see the sort of applications this technology can have, as well as providing opportunities to upskill our employees in this extremely interesting area of technology.
Audacia is a software development company based in the UK, headquartered in Leeds. View more technical insights from our teams of consultants, business analysts, developers and testers on our technology insights blog.
Technology Insights