
In part 1 we built, tested and published a model within Microsoft LUIS. Today we’ll be consuming our new RESTful API, and building a simple web application which can consume it. We’ll also be looking at how we can improve the performance of our model over time.
Please note that we’ve redacted our LUIS keys and app ID throughout the screenshots.
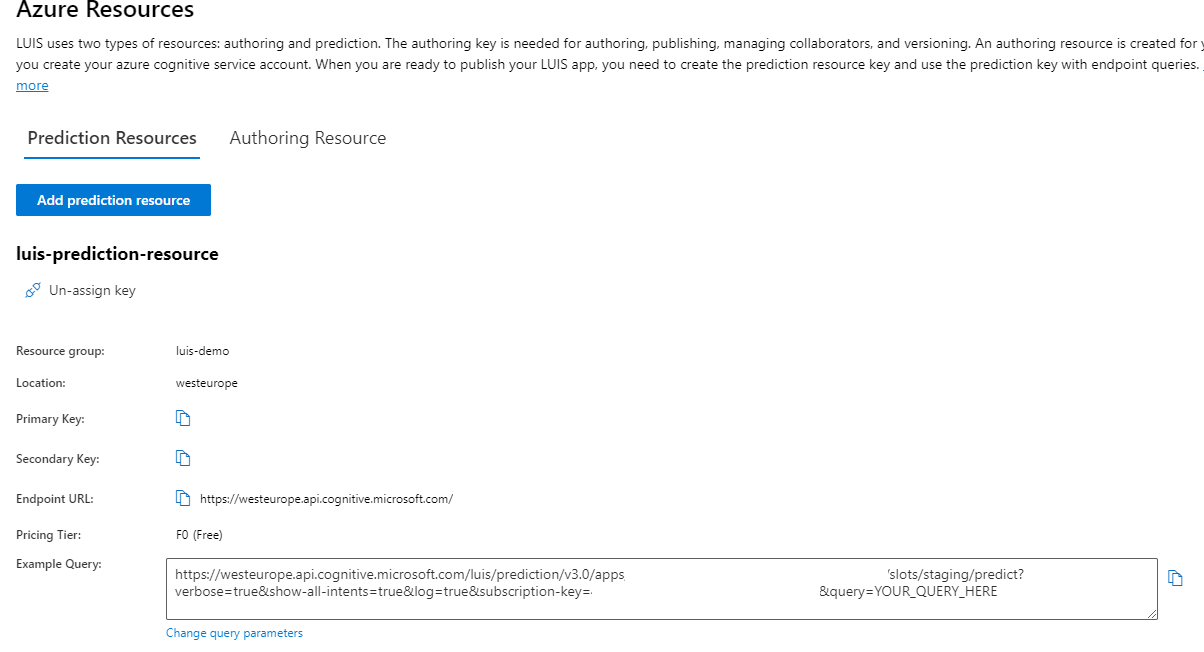
We left part 1 with our model published to a Microsoft LUIS prediction resource in Azure, ready to be queried via HTTP:
Querying with Postman
Postman is a tool for testing HTTP requests. If you don’t already have it, start by downloading and installing the postman desktop application.
Once you’ve got Postman running, copy the “Example Query” from the LUIS “Azure Resources” screen and paste it into a new “GET” request in Postman.
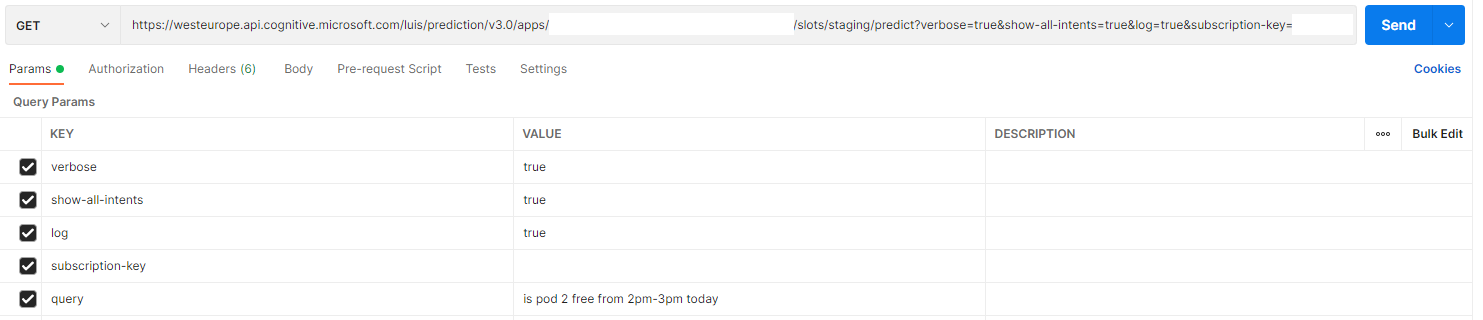
At the end of the URL, here, there is a YOUR_QUERY_HERE prompt to insert your query. This is the only thing that needs to be changed in order to start querying our API. Because we’re using Postman we don’t even need to manually edit the URL or worry about encoding, instead we can directly edit the query parameter on the params tab.
Below I’ve changed the query to “is pod 2 free from 2pm-3pm today”:
Sending this request brings back a JSON HTTP response. LUIS scores our utterance against each intent and selects a top intent, which it believes is the most likely candidate. In this case, it has correctly identified that this is a request to check availability.
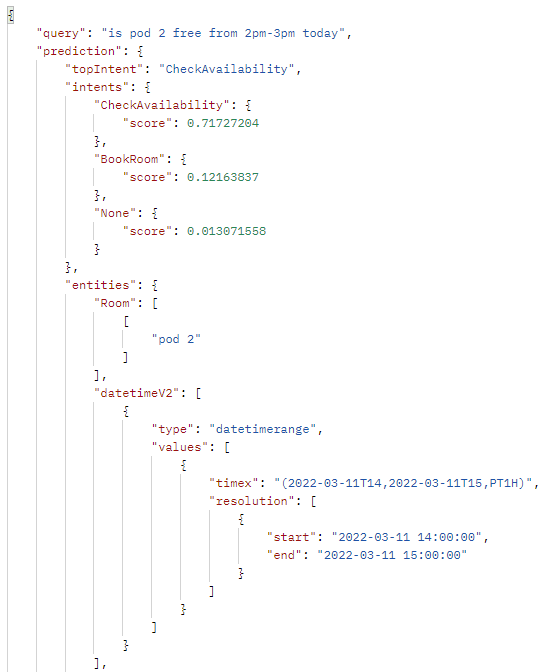
Looking further into the response we can see that LUIS has extracted out entities, both correctly identifying the room we were interested in, and extracting a datetimeV2 entity. In this case the entity has a type of datetimerange, and contains a separate start and end which cover the time range we’re interested in (2pm to 3pm).
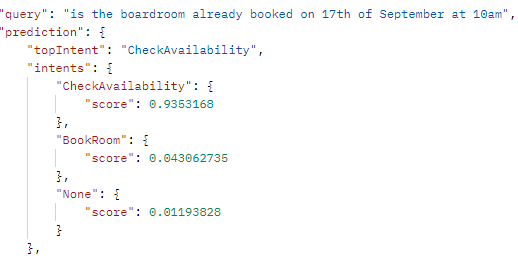
Let’s try another, more specific and complicated request; “is the boardroom already booked on 17th of September at 10am?”.

In this case you can see that LUIS has incorrectly identified this request as a request to book a room, when we were actually querying availability.
As we’ve done above, by specifying the parameter show-all-intents as true, we can see the scores applied to each different intent. This can be very useful in a scenario like the above where we don’t think any intent has scored high enough to be a certainty - our application could respond “I’m sorry I didn’t understand the request, could you rephrase it?”, or “did you mean X?” if all of the intents scored less than 0.5.
Improving App Performance
LUIS did not perform well with the question we just asked and, in fact, suggested the wrong intent.
In order to combat this we can improve our models performance over time by reviewing endpoint utterances, assigning these to the correct intent, then retraining our model.
From your app in the LUIS portal click “Review endpoint utterances”:
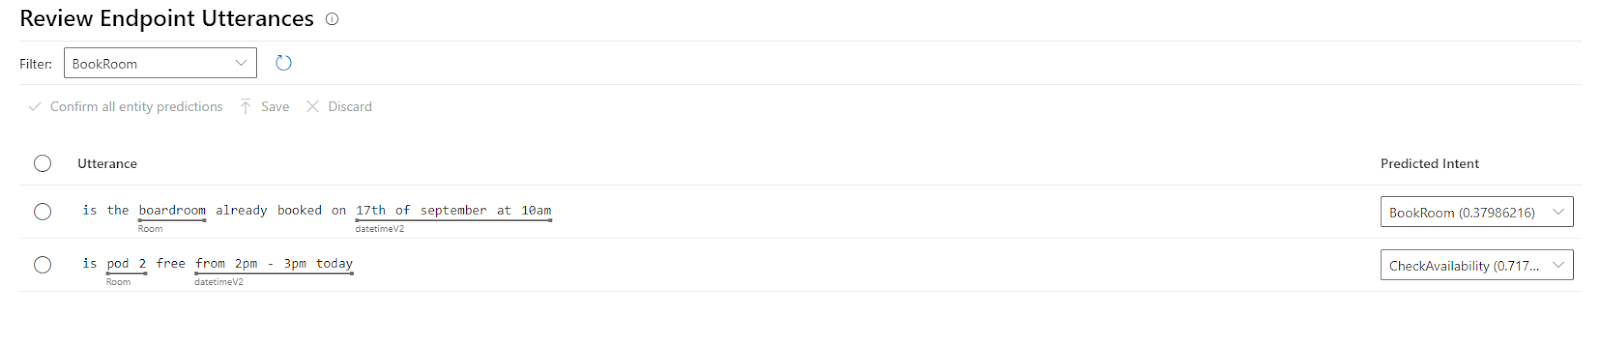
As you can see the requests we’ve made appear here, along with the prediction LUIS made about our intent.
In order to assign these utterances to a different intent, we can change the value in the “Predicted Intent” drop down, select our intent, then click save.
Returning to our CheckAvailability intent, we can now see the two new utterances here:

At this stage we can retrain and republish our model (see part 1 for how to train and publish a model).
Now we’ve retrained and published the model, let’s retry the “is the boardroom already booked on 17th of September at 10am?” request:
As you can see, not only is the model now selecting the correct top intent, it is also scoring it over 0.9. After retraining, our model is now very confident that this is the intent we wanted.
Application Overview
Now that we’ve tested, re-trained and re-published our model, let’s look at how we can connect it to a web application.
I’ve used Vue.js and TypeScript to build a simple proof-of-concept application. Vue is an open source, single page app framework, like React or Angular.
At this stage it is worth some important disclaimers:
- This is absolutely a quick, hacked together, mess of an application in order to give a simple demonstration of how to consume a LUIS API from a web application, and is not even remotely production ready. This code should not be used by anyone in production, ever.
- I am not and will not be doing any work to maintain the project, review npm dependencies for security vulnerabilities etc. There is not even a README.
- None of; Philip Rashleigh, Audacia Consulting Limited, or any associated parties shall be held liable in any way for any issues resulting from its use.
Now that the reader has been suitably warned, you can find the code in my github.
In addition to the standard Vue CLI output, I’ve added bootstrap because I’m not very good at CSS and axios in order to make communicating with the RESTful API simple.
At a high-level, the application takes the user-typed queries and sends them to the prediction API. Responses from the API are then handled and depending on the top intent the application will either book a room or confirm/deny availability.
At the moment rather than having any external database, bookings are stored in an in-memory array in the vue app that will be wiped if the page is refreshed.
Configuration
In order to get up and running, you’ll need to replace the redacted “{URLHERE}” in Chat.vue with you published API URL (the one we’ve been using in Postman). The section of the URL that’s going to change for each request will be the query parameter, so remove everything after query=. You should end up with something that looks like the below:
let url =
“https://westeurope.api.cognitive.microsoft.com/luis/prediction/v3.0/apps/{App-ID}/slots/staging/predict?verbose=true&show-all-intents=true&log=true&subscription-key={Subscription-Key}&query=”
Obviously good practice would dictate a URL like this being an environment variable rather than being hard-coded, however (as I’ve already made clear) this is a proof of concept, not a production ready application.
Code
We’ll now take a walk through the interesting bits of the TypeScript code (the majority of which can be found in src/components/Chat.vue).
First off, near the top of the TypeScript, you can see I’ve initialised a text variable (which is bound to the text input box) and a booking array for our room bookings.
I’ve also initialised a messages array with a message from the bot saying “How can I help you?” (note that we can specify whether the message is the bot or the user, which is then used to configure the display appropriately):
  text = "";
  messages : [Speaker, string][] = [
    [ "Bot", "How can I help you?" ]
  ];
  bookings: Booking[] = [];
Following this we capture a key down event in a text input box. When the user presses enter we add their message into the list of messages for display. We also URL encode the message, and then query the API using axios.
When we receive a response from our LUIS prediction resource we pass this to an interpretResponse method to take next steps:
keyDown(event: KeyboardEvent) {
    if(event.key != "Enter") {
      return;
    }

    this.messages.push([ "User", this.text ]);

    let url =
      "{URLHERE}";

    const query = encodeURIComponent(this.text);

    url += query;

    this.text = "";

    axios.get<QueryResponse>(url).then(response => {
      this.interpretResponse(response.data);
    });
  }
Before we dig into the interpretResponse logic let’s take a brief look at how we decode the JSON response from the API into a TypeScript model.
I’ve created a model in src/query-response.ts which matches the high level schema of the API response we’ve seen in postman:
export type Entity = "datetimeV2" | "Room" | "personName" | "BookingTitle";

export type Intent = "BookRoom" | "CheckAvailability" | "None";

export interface QueryResponse {
    query: string,
    prediction: Prediction
}

interface Prediction  {
    topIntent: Intent,
    intents: Record<Intent, IntentScore>
    entities: Record<Entity, any[]>
}

interface IntentScore {
    score: number;
}
The entities property has an any[] array for it’s values. LUIS entities can have different schemas depending on their type (and in the case of more complex types like datetimeV2 they can get quite complicated). If I were building something more production-ready I would have spent some time here to build a model matching the schema for each of the different entities we are using - but I hope the reader can forgive me for not doing this due to the proof-of-concept nature of this code.
It is also worth noting here that within the options for Intent, there is a “None” intent. The “None” intent is created by LUIS as a default (you may have already noticed it following the steps in part 1). The purpose of the “None” intent is to allow for situations where a user might make a request that doesn’t match up strongly to any of our other intents.
Now we’ve got an understanding of how the LUIS response will be decoded, let’s look at how to interpret the response from LUIS:
private interpretResponse(data: QueryResponse) {
    const intent = data.prediction.topIntent;

    if(intent === "None") {
      this.messages.push([ "Bot", "I'm sorry - I didn't understand that?"]);
      return;
    }

    const potentialBooking = this.extractPotentialBook(data);
    const isAvailable = this.checkAvailability(potentialBooking);

    if(!isAvailable) {
      this.messages.push([ "Bot", "The requested room is not available"]);
      return;
    }

    switch(intent) {
      case "CheckAvailability":
        this.messages.push([ "Bot", "Yes the room is available please request to book."]);
        break;
      case "BookRoom":

        this.bookings.push(potentialBooking);
        this.messages.push([ "Bot", `"${potentialBooking.title}" booked in ${potentialBooking.room}`]);
        break;
    }
  }
As you can see this code first checks for the “None” intent. Following this it extracts a potential booking using the extractPotentialBook function:
private extractPotentialBook(data: QueryResponse) : Booking {
    // Default bookings to "Pod 1"
    const room = data.prediction.entities.Room?.[0]?.[0] as string || "Pod 1";

    //Default title to "Unknown Meeting" if not specified
    const title = data.prediction.entities?.BookingTitle?.[0] as string || "Unknown Meeting";

    const attendees = data.prediction.entities?.personName as string[] || [];

    const dateTimeParser = new DateTimeParser(data.prediction.entities.datetimeV2);

    return {
      room,
      title,
      attendees,
      startDateTime: dateTimeParser.start,
      endDateTime: dateTimeParser.end
    };
   }
 }
The end result of this function is a booking object with a room (room: string), a title for the meeting (title: string), a start (startDateTime: Date), an end (endDateTime: Date) and a list of attendees (attendees: string). If any of these properties are not present in the response they are are defaulted like so:
- "Unknown meeting" for
title - "Pod 1" for
room - An empty set of
attendees - Now for
startDateTime(usingDateTimeParser) - An hour after the start for endDateTime (using
DateTimerParser)
As a quick aside, you can see I’ve created a class called DateTimeParser. This does some hacky things with regular expressions to pull out the dates from the response due to the fact that there are various different subtypes of datetimeV2 all of which are structured slightly differently (again - proof-of-concept not production ready application).
After extracting a potential booking, the code checks whether the selected room is available at the given time. It does so by looking at the existing bookings and checking for any overlaps on room and start/end time. If there is an overlap then the room is not available:
private checkAvailability(potentialBooking: Booking) {
    const hasOverlap = this.bookings.length > 0 && this.bookings.some(existingBooking => {
      return existingBooking.room === potentialBooking.room
        && existingBooking.startDateTime < potentialBooking.endDateTime
        && potentialBooking.startDateTime < existingBooking.endDateTime;
    });

    return !hasOverlap;
  }
If the user's input was a request to check availability and the room is available then the bot will confirm the availability
If they requested to book the room: the booking will be added to the booking calendar and the bot will confirm that that room has been booked.
User Walk-through
Now we’ve seen the code, let’s do a walk-through from the perspective of a user to see the end result in action.
For example, let’s assume I’d like to book the boardroom from 1pm to 3pm this Friday.
When the application is first run, the bot asks “How can I help you?”, and allows me to enter a request in the message bar, such as “is the boardroom free from 1pm to 3pm on Friday?”.

As you can see there are currently no boardroom bookings at that time (in our in-memory bookings array).
I can then make the further request “book the boardroom from 1pm to 3pm on Friday for a meeting with Adam Stirk called ‘LDF demo Retrospective’”. This results in a booking being added and displayed in a basic list on the right hand side.
After this if I re-ask “is the boardroom free from 1pm to 3pm on Friday?” I will be told it is not, as I have already made a booking then.

Further LUIS Functionality
Before I close off, it should be noted that LUIS has other additional functionality which we’ve not examined in this series, including features and patterns.
In addition, LUIS provides prebuilt domains, which provide solutions to common problems:
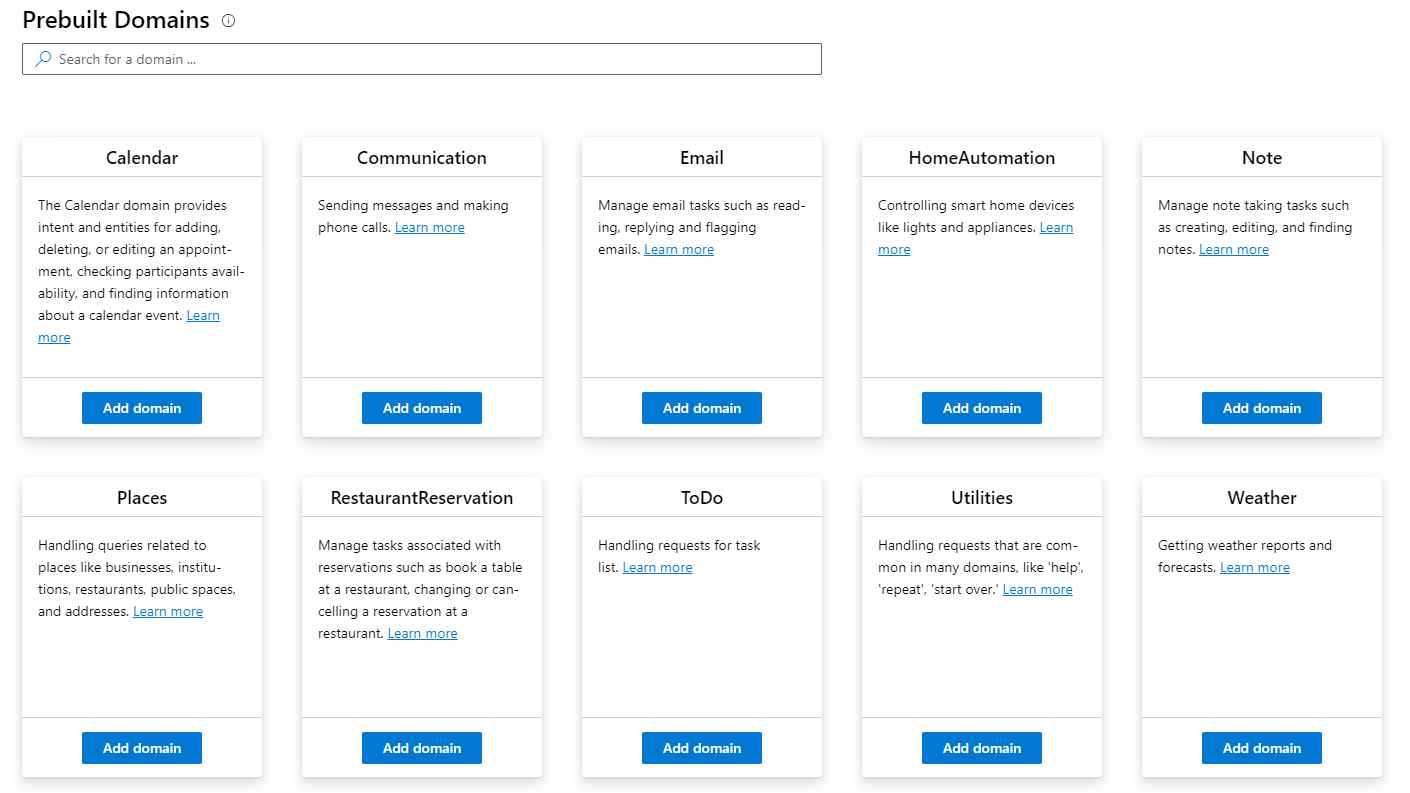
Pre-built domains come with lots of example entities, intents and utterances which can be imported into your LUIS app.
The prebuilt “Calendar” domain comes with many intents and utterances useful for booking, editing and deleting meetings and appointments, and does a much better and more exhaustive job of calendar management than the simple example we have built.
Conclusion
This series has introduced you to some of the functionality of Microsoft LUIS.
I’ve given a step by step tutorial of how to:
- Build and train a LUIS model, then publish it as a RESTful API.
- Improve the models' natural language processing ability over time by adding further utterances.
- Consume the RESTful API from a web application to create a simple chat bot.
If you would like to learn more about Azure Cognitive Services and building bots in the Microsoft ecosystem there are plenty of great resources available including:
- Microsoft Bot Framework, which provides an SDK, a huge amount of example code, prebuilt bots and tutorials on how to build your own bots.
- Speech to Text - in this series we’ve only worked with typed user input, however a very common use case for natural language text processing (as proven by the success of Amazon Echo and Google Nest) is voice input. To allow for voice input you can make use of Microsoft’s Speech to Text and then pass it’s output into LUIS to interpret the intent.
- QNA Maker is a really powerful tool to make support chat bots. You can get to the point of publishing a RESTful API to answer common questions from your users in a matter of minutes. It is even able to extract questions and responses from web resources and uploaded documents.
Audacia is a leading software development company based in the UK, headquartered in Leeds. View more technical insights from our teams of consultants, business analysts, developers and testers on our technology insights blog.
Technology Insights